写在前面
通过前面SpringCloud入门篇(一)- 简介,我们基本上了解到本系列文章我们需要涉及的各种组件了,今天就让我们认识下Eureka。由于前面我们已经废话太多,这里我们就直接开始。
创建Eureka服务
Eureka作为服务中心,我们这里要使用的也是其服务发现这一重要特性。需要注意的是,由于其本身也是服务,所以正常情况下,它是可以发现自身的。
我们首先创建一个基础项目CloudBlogProject
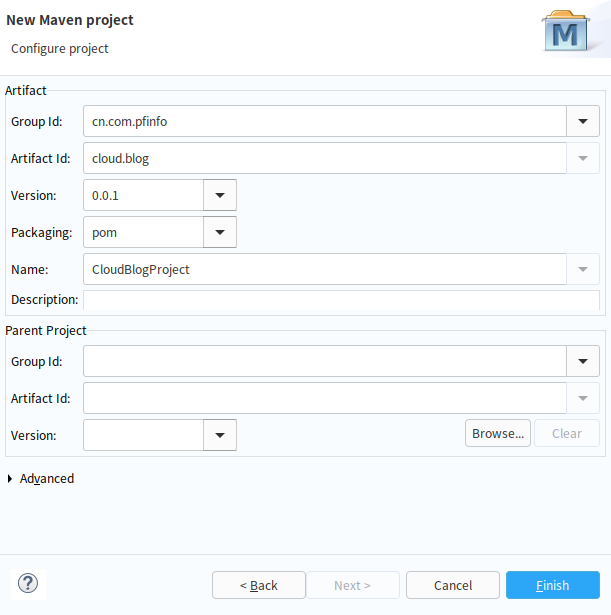
之后我们修改一下pom.xml,以便后续维护:
<project xmlns="http://maven.apache.org/POM/4.0.0"
	xmlns:xsi="http://www.w3.org/2001/XMLSchema-instance"
	xsi:schemaLocation="http://maven.apache.org/POM/4.0.0 https://maven.apache.org/xsd/maven-4.0.0.xsd">
	<modelVersion>4.0.0</modelVersion>
	<groupId>cn.com.pfinfo</groupId>
	<artifactId>cloud.blog</artifactId>
	<version>0.0.1</version>
	<packaging>pom</packaging>

	<parent>
		<groupId>org.springframework.boot</groupId>
		<artifactId>spring-boot-starter-parent</artifactId>
		<version>2.0.3.RELEASE</version>
		<relativePath /> <!-- lookup parent from repository -->
	</parent>

	<name>BaseCloud</name>

	<properties>
		<project.build.sourceEncoding>UTF-8</project.build.sourceEncoding>
		<project.reporting.outputEncoding>UTF-8</project.reporting.outputEncoding>
		<java.version>1.8</java.version>
		<spring-cloud.version>Finchley.RELEASE</spring-cloud.version>
	</properties>

	<dependencyManagement>
		<dependencies>
			<dependency>
				<groupId>org.springframework.cloud</groupId>
				<artifactId>spring-cloud-dependencies</artifactId>
				<version>${spring-cloud.version}</version>
				<type>pom</type>
				<scope>import</scope>
			</dependency>
		</dependencies>
	</dependencyManagement>
	<build>
        <plugins>
            <plugin>
                <groupId>org.springframework.boot</groupId>
                <artifactId>spring-boot-maven-plugin</artifactId>
            </plugin>
        </plugins>
    </build>
</project>
然后,创建一个Maven Module:
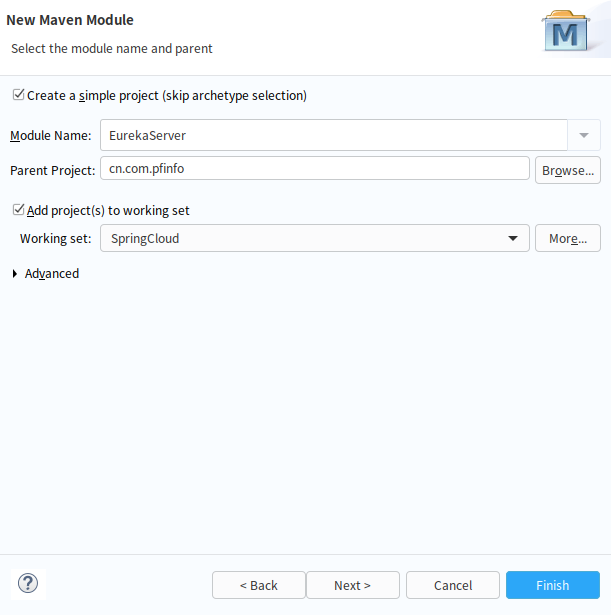
同样,也是修改pom.xml,如下:
<project xmlns="http://maven.apache.org/POM/4.0.0"
	xmlns:xsi="http://www.w3.org/2001/XMLSchema-instance"
	xsi:schemaLocation="http://maven.apache.org/POM/4.0.0 https://maven.apache.org/xsd/maven-4.0.0.xsd">
<!-- 其他省略 -->
<dependencies>
	<dependency>
		<groupId>org.springframework.cloud</groupId>
		<artifactId>spring-cloud-starter-netflix-eureka-server</artifactId>
	</dependency>

	<dependency>
		<groupId>org.springframework.boot</groupId>
		<artifactId>spring-boot-starter-test</artifactId>
		<scope>test</scope>
	</dependency>
</dependencies>

<project>
在EurekaService中,我们创建一个启动类EurekaServerApplication.java:
package cn.com.pfinfo.eurekaserver;

import org.springframework.boot.SpringApplication;
import org.springframework.boot.autoconfigure.SpringBootApplication;
import org.springframework.cloud.netflix.eureka.server.EnableEurekaServer;

@EnableEurekaServer
@SpringBootApplication
public class EurekaServerApplication {

    public static void main(String[] args) {
        SpringApplication.run(EurekaServerApplication.class, args);
    }
}
修改配置文件application.properties:
spring.application.name=eureka-server
#服务注册中心端口号
server.port=8080
#服务注册中心实例的主机名
eureka.instance.hostname=127.0.0.1
#是否向服务注册中心注册自己
eureka.client.register-with-eureka=false
#是否检索服务
eureka.client.fetch-registry=false
#服务注册中心的配置内容,指定服务注册中心的位置
eureka.client.serviceUrl.defaultZone=http://${eureka.instance.hostname}:${server.port}/eureka/
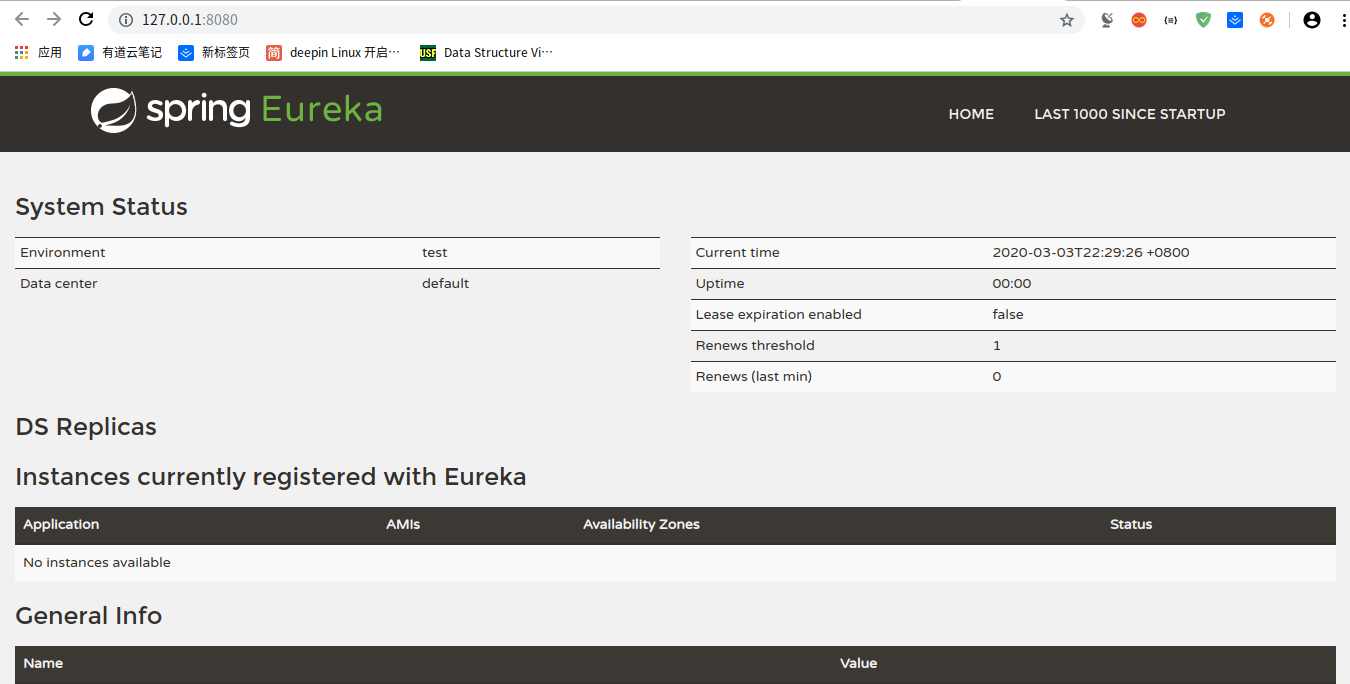
我们启动一下,打开127.0.0.1:8080
集群版本(伪)
除了我们自己学习的时候会这么搭建单机Eureka,企业基本不会这样选择,人家玩的都是集群。那我们怎么搭建集群Eureka呢?
为了减少大家的学习成本(不论是知识上还是硬件上的),这里就在单机上实现伪集群。
我们只用在EurekaServer中创建2个配置文件application-eureka-secondary.properties、application-eureka-tertiary.properties
它们与application.properties区别只有下面这些不一样:
# application的配置
server.port=8080
eureka.instance.hostname=eureka-primary
eureka.client.serviceUrl.defaultZone=http://eureka-secondary:8078/eureka/,http://eureka-tertiary:8079/eureka/

# eureka-secondary的配置
server.port=8078
eureka.instance.hostname=eureka-secondary
eureka.client.serviceUrl.defaultZone=http://eureka-primary:8080/eureka/,http://eureka-tertiary:8079/eureka/

# eureka-tertiary的配置
server.port=8079
eureka.instance.hostname=eureka-tertiary
eureka.client.serviceUrl.defaultZone=http://eureka-primary:8080/eureka/,http://eureka-secondary:8078/eureka/
然后,我们修改hosts,添加如下配置
127.0.0.1 eureka-primary
127.0.0.1 eureka-secondary
127.0.0.1 eureka-tertiary
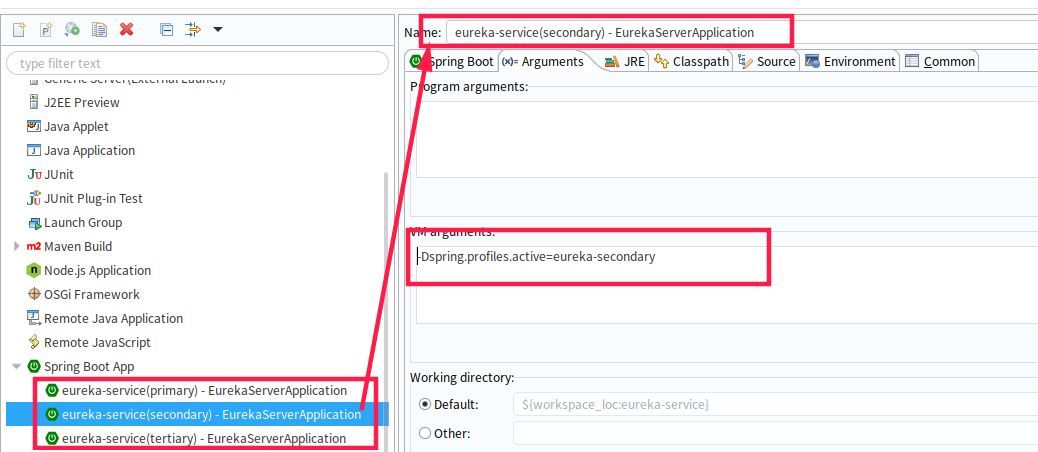
我们依次创建启动配置,为了方便,我们分别命名为:
eureka-service(primary) - EurekaServerApplication
eureka-service(secondary) - EurekaServerApplication
eureka-service(tertiary) - EurekaServerApplication
修改对应配置的VM arguments,添加对应配置:
#eureka-secondary
-Dspring.profiles.active=eureka-secondary

#eureka-tertiary
-Dspring.profiles.active=eureka-tertiary
注意:primary使用的application,所以不用添加)。
以eureka-secondary为例,配置如下:
 然后分别启动:primary、secondary、tertiary。
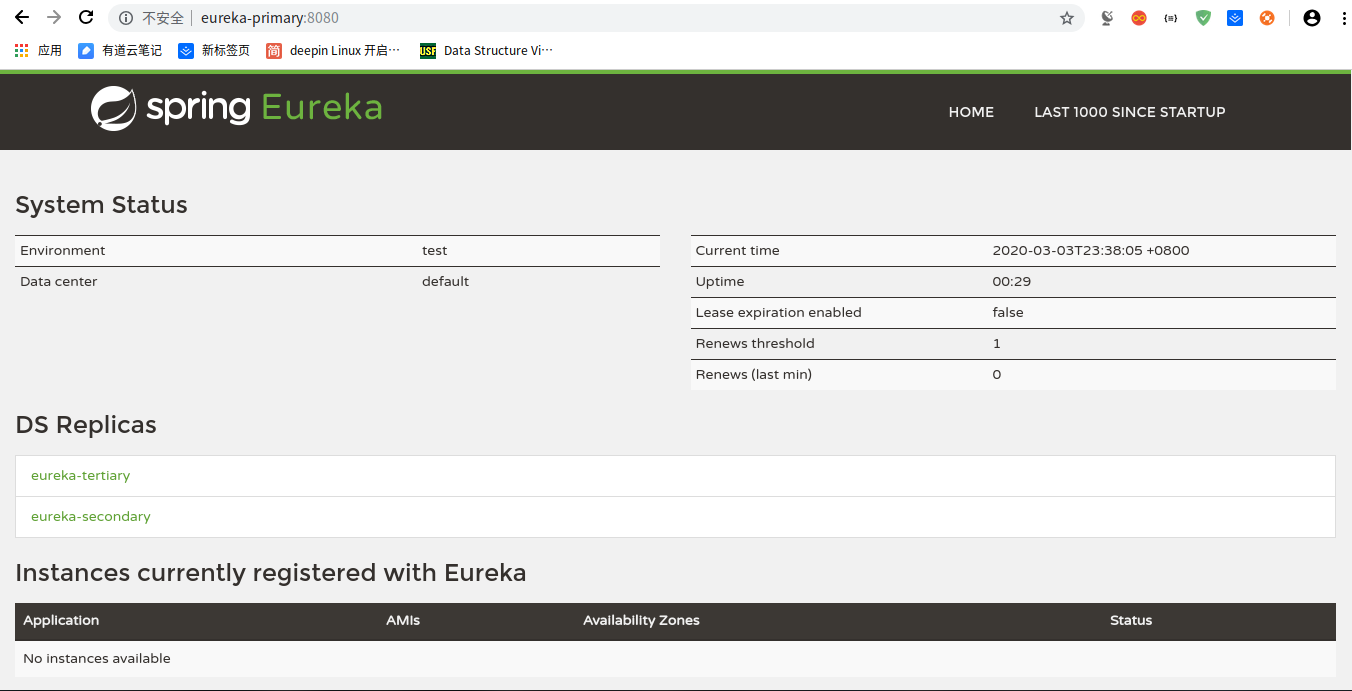
再次点开127.0.0.1:8080或者eureka-primary:8080我们就能看见如下界面
后话
当然,如果你最后打开发现有一行红字,不同担心,网上有很多解决办法,你可以自行百度。
本文由 cuitpanfei 创作,采用 知识共享署名4.0 国际许可协议进行许可
本站文章除注明转载/出处外,均为本站原创或翻译,转载前请务必署名
最后编辑时间为:
2020/03/06 09:17
